
I’ve always loved the delicate and buttery taste of Japanese butter cookies. These cookies are light, crisp, and melt-in-your-mouth delicious, making them the perfect treat for any occasion. Once you try them, I promise they’ll become a household favorite!
My Favorite Japanese Butter Cookies
It’s said that Japanese butter cookies can be quite pricey—about $45 for 12 pieces. When I first heard this, I was truly amazed!
How could something so simple and small cost so much?
Determined to recreate these delicate treats at home, I gave it a try and was pleasantly surprised.
The recipe turned out to be much easier than I had imagined, and the results were stunning.
The best part about these cookies is their incredible crispiness—so delicate they practically crumble to pieces with each bite.
My husband couldn’t stop raving about them, saying they were almost identical to the store-bought ones. I think the key lies in the browned butter, which adds a deep, nutty aroma and elevates the flavor to a whole new level.
To achieve that signature rich flavor, I used 40g of browned butter, carefully strained it, and measured out exactly 26g for the dough.
The process of browning the butter may sound intimidating, but with a little patience and attention, it’s completely worth the effort.

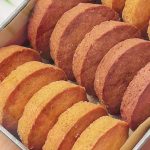
I decided to make two versions of these cookies: the classic original flavor and a cocoa version for those who love a hint of chocolate.
This recipe outlines the steps for the original flavor, but making the cocoa variation is as simple as replacing 8g of cake flour with cocoa powder. The rest of the steps remain exactly the same.
This recipe yields about 10-12 cookies, perfect for sharing with loved ones or savoring alongside a cup of tea or coffee.
Why You‘ll Love This Recipe
- Perfect texture: Light, crispy, and buttery, these cookies melt in your mouth.
- Nutty aroma: The browned butter gives a rich, deep flavor that makes these cookies stand out.
- Customizable: Add cocoa powder for a chocolate variation without altering the rest of the recipe.
Ingredients
- 150g butter (40g for browned butter, 110g softened butter)
- 2g sea salt
- 50g icing sugar
- 20g whole egg (room temperature)
- 26g bread flour
- 24g almond flour
- 100g cake flour (replace 8g with cocoa powder for chocolate cookies)
Instructions
1. Brown the Butter
- Place 40g butter in a small saucepan over low heat. Stir constantly with a spatula to ensure even heating.
- As it melts, fine bubbles will form. Continue heating as the color turns from pale yellow to light brown, then deep brown. A nutty aroma will appear—turn off the heat immediately.
- Strain the browned butter through a fine sieve into a heatproof container. Set aside 26g for later use.


2. Soften and Whip the Butter
- Cut the remaining 110g butter into small pieces and let it soften at room temperature until easily indented with a finger.
- Add 2g sea saltand 50g icing sugar. Use a spatula to mix slightly, preventing the sugar from flying when whipped.
- Using an electric mixer, beat the butter mixture at low speed, then high speed, until pale, fluffy, and light—similar to a feather-like texture.

 3. Add Egg and Browned Butter
- Gradually add 20g room-temperature egg in three parts. After each addition, beat at low speed until fully absorbed.
- Add the cooled browned butter in three parts as well, beating after each addition until fully incorporated into the mixture.

4. Sift in the Dry Ingredients
- Combine and sift 26g bread flour, 24g almond flour, and 100g cake flour(or 92g cake flour + 8g cocoa powder for chocolate cookies).
Gently fold the dry ingredients into the butter mixture using a spatula. Use a flipping motion from bottom to top, being careful not to overmix to avoid gluten formation. Stop once the dough comes together evenly.

 5. Shape and Chill the Cookies
- Transfer the dough into a piping bag fitted with a 1 – 1.5 cm tip. Pipe your desired cookie shapes onto a non-stick baking tray.
- Chill the piped cookies in the refrigerator for 10 minutes to help them hold their shape during baking.


6. Bake and Cool
- Preheat the oven to 165°C.
- Smooth any uneven spots on the cookies with a damp fingertip.
- Bake the cookies on the middle rack for 25 – 38 minutes, adjusting time as needed based on your oven and cookie size. The cookies are done when the edges are golden.
Let the cookies cool. Once completely cooled, gently twist to remove them from the tray.

 Notes
Notes
- Browning Butter: Keep the heat low and watch closely—once the butter turns brown, remove it immediately to prevent burning.
- Mixing the Dough: Fold gently to keep the cookies light and crisp. Overmixing leads to gluten development, which makes cookies tough.
- Baking Tip: Adjust the baking time and temperature based on your oven. If the cookies brown too quickly, lower the temperature or cover them with foil.
Frequently Asked Questions
- Can I make chocolate-flavored cookies with this recipe?
Yes! Simply replace 8g cake flour with 8g cocoa powder when sifting the dry ingredients. Follow the rest of the steps as usual. - Why is browned butter used in this recipe?
Browning the butter gives the cookies a rich, nutty aroma and deepens their flavor, making them taste extra special. - How do I know when the cookies are done baking?
The edges should be lightly golden. The baking time may vary slightly, so keep an eye on them during the final few minutes. - Can I freeze the dough for later use?
Yes, you can freeze the piped dough on a tray until solid, then transfer to an airtight container. Bake straight from frozen, adding a couple of extra minutes to the baking time.
Crispy and Buttery: Homemade Japanese Butter Cookies
Ingredients
- 150 g butter 40g for browned butter, 110g softened butter
- 2 g sea salt
- 50 g icing sugar
- 20 g whole egg room temperature
- 26 g bread flour
- 24 g almond flour
- 100 g cake flour replace 8g with cocoa powder for chocolate cookies
Instructions
Brown the Butter
- Place 40g butter in a small saucepan over low heat. Stir constantly with a spatula to ensure even heating.
- As it melts, fine bubbles will form. Continue heating as the color turns from pale yellow to light brown, then deep brown. A nutty aroma will appear—turn off the heat immediately.
- Strain the browned butter through a fine sieve into a heatproof container. Set aside 26g for later use.
Soften and Whip the Butter
- Cut the remaining 110g butter into small pieces and let it soften at room temperature until easily indented with a finger.
- Add 2g sea saltand 50g icing sugar. Use a spatula to mix slightly, preventing the sugar from flying when whipped.
- Using an electric mixer, beat the butter mixture at low speed, then high speed, until pale, fluffy, and light—similar to a feather-like texture.
Add Egg and Browned Butter
- Gradually add 20g room-temperature egg in three parts. After each addition, beat at low speed until fully absorbed.
- Add the cooled browned butter in three parts as well, beating after each addition until fully incorporated into the mixture.
Sift in the Dry Ingredients
- Combine and sift 26g bread flour, 24g almond flour, and 100g cake flour(or 92g cake flour + 8g cocoa powder for chocolate cookies).
- Gently fold the dry ingredients into the butter mixture using a spatula. Use a flipping motion from bottom to top, being careful not to overmix to avoid gluten formation. Stop once the dough comes together evenly.
Shape and Chill the Cookies
- Transfer the dough into a piping bag fitted with a 1 - 1.5 cm tip. Pipe your desired cookie shapes onto a non-stick baking tray.
- Chill the piped cookies in the refrigerator for 10 minutes to help them hold their shape during baking.
Bake and Cool
- Preheat the oven to 165°C.
- Smooth any uneven spots on the cookies with a damp fingertip.
- Bake the cookies on the middle rack for 25 - 38 minutes, adjusting time as needed based on your oven and cookie size. The cookies are done when the edges are golden.
- Let the cookies cool. Once completely cooled, gently twist to remove them from the tray.