
Making homemade condensed milk is not only easy, but it also allows you to create a smoother, more flavorful product without any preservatives or unnecessary additives. This homemade version is perfect for desserts, baking, or even just as a sweet treat on its own. Trust me, once you try it, you won’t go back to store-bought!
Why Homemade Condensed Milk?
I’ve always been someone who’s obsessed with making everything from scratch.
Whether it’s red bean paste, blueberry jam, homemade luncheon meat, or ladyfingers, I enjoy the process and the satisfaction of knowing exactly what goes into my food.
The best part? I can control every ingredient. Especially with kids at home, I prefer to avoid any unnecessary additives or preservatives that might be lurking in store-bought products.
Homemade condensed milk is no exception. I truly believe my version is better than the store-bought stuff. It’s not only more delicious but also more authentic, and I can make it just the way I like.
Plus, it’s incredibly easy to make—no complicated steps, and it only requires four ingredients. Honestly, I can’t see why I’d ever go back to buying it!
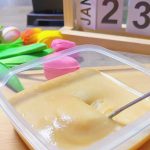
To achieve the perfect texture, I strain the condensed milk after it’s done cooking to make it super smooth. But this is optional—if you don’t mind a slightly chunkier texture, you can skip this step entirely. I just like the silky, velvety consistency it gives when it’s perfectly strained.
The Secret Ingredient: Why I Always Add Maltose to My Condensed Milk
One of my secret weapons in making homemade condensed milk is maltose. It’s a key ingredient that makes the texture richer and smoother, and it helps mimic the store-bought version more closely.
The maltose also gives my condensed milk a slight yellow tint, which is totally natural. It’s the reason my condensed milk has a more golden hue compared to other recipes you may find.
I’ve experimented with making this without maltose, but honestly, the results were just not the same. Without it, the condensed milk lacks that smooth, stretchy pull when it cools down. For me, the “pulling” effect is one of the best parts, so I always make sure to add maltose.
How to Use Homemade Condensed Milk
I love serving my homemade condensed milk with fried mantou (steamed buns).
But that’s not the only way to enjoy it!
I love drizzling it over desserts like my homemade Mango Ice Cream and Strawberry Ice Cream or pairing it with pancakes and waffles for an extra touch of sweetness. It’s also fantastic stirred into coffee or tea, adding a rich, creamy flavor.
You can use it in any recipe that calls for condensed milk, from tarts and cakes—like my Rice Cooker Cake and Honeycomb Cake—to refreshing treats like Grass Jelly Dessert.
Ingredients:
- 300g whole milk
- 150g white sugar
- 50g milk powder
- 80g maltose
Instructions:
Mix Ingredients: Place all ingredients into a non-stick pot. Stir gently to combine.
Simmer on Low Heat: Put the non-stick pot on the stove over low heat. Stir constantly with a silicone spatula to prevent the milk from burning at the bottom. At the start, the mixture will gradually warm up, and small bubbles may appear on the surface, which is normal. As the temperature rises, the bubbles will increase.

Simmer Until Thickened: Keep simmering on low heat. As the liquid evaporates, the condensed milk will thicken. Continuously observe the texture and stir to ensure even heating. When the mixture becomes thicker, it’s nearly done.
Test the Threading: At this point, use the silicone spatula to lift some of the condensed milk and observe the way it drips. If it drips slowly, it’s ready. Avoid overcooking to prevent it from becoming too dry.
Bottle and Store: Turn off the heat. If you want a smoother texture, you can strain it. Let the condensed milk cool to a warm temperature, then pour it into a clean, airtight container. Seal the container and store it in a cool place or refrigerate it. The freshly made condensed milk might still be slightly runny, but it will thicken further after refrigeration.


Notes:
- Always simmer on low heat to prevent the condensed milk from burning, which would affect the taste and color.
- Stir continuously to avoid burning and to ensure even heating, which will make the texture smoother.
- Different brands of milk and milk powder may vary in thickness and composition, so adjust the simmering time and consistency as needed.
- Ensure the container used for storing the condensed milk is free of water and oil to prevent spoilage. Always use clean tools when taking out the condensed milk to avoid introducing moisture or impurities.
Frequently Asked Questions:
Can I use a different type of milk?
Yes, you can use other types of milk like skim or low-fat, but whole milk will give you the richest, creamiest texture.
How long can I store this homemade condensed milk?
Homemade condensed milk can be stored in an airtight container for up to 1 month in the refrigerator.
Can I adjust the sweetness?
Yes, you can add more or less sugar depending on your preference, but keep in mind that reducing the sugar too much may affect the texture.
Perfectly Smooth Homemade Condensed Milk
Ingredients
- 300 g whole milk
- 150 g white sugar
- 50 g milk powder
- 80 g maltose
Instructions
- Mix Ingredients: Place all ingredients into a non-stick pot. Stir gently to combine.
- Simmer on Low Heat: Put the non-stick pot on the stove over low heat. Stir constantly with a silicone spatula to prevent the milk from burning at the bottom. At the start, the mixture will gradually warm up, and small bubbles may appear on the surface, which is normal. As the temperature rises, the bubbles will increase.
- Simmer Until Thickened: Keep simmering on low heat. As the liquid evaporates, the condensed milk will thicken. Continuously observe the texture and stir to ensure even heating. When the mixture becomes thicker, it's nearly done.
- Test the Threading: At this point, use the silicone spatula to lift some of the condensed milk and observe the way it drips. If it drips slowly, it's ready. Avoid overcooking to prevent it from becoming too dry.
- Bottle and Store: Turn off the heat. If you want a smoother texture, you can strain it. Let the condensed milk cool to a warm temperature, then pour it into a clean, airtight container. Seal the container and store it in a cool place or refrigerate it. The freshly made condensed milk might still be slightly runny, but it will thicken further after refrigeration.